Thursday, November 22, 2012

Finished Exhaust

Final fit up of the complete exhaust. With all the mounts in place it is very sturdy, and has almost no movement when you yank on it.

Welded stainless nuts onto the dump pipe flanges, for ease of removing and installing the caps. I love the golden colour stainless goes when welded. I'll be fabricating thin stainless sheet metal guides onto the caps that smoothly divert the exhaust flow from the 3.5" pipes into the 3" x-pipe.


The whole thing is pretty much invisible when the car is the right way up. Now I should be able to run the car nice and low!

Tuesday, November 20, 2012

latest exhaust bits

Exhaust is pretty much done, at least for now. The flange at the header end will be welded on once the engine is in the car.

I added some stainless bungs for O2 sensors to help with tuning.

There are 4 mounts to the body, with 10mm stainless hangers and polyurethane isolators. I braced the floor with plates welded to the body and welded 10mm nuts to the other side to make mounting and adjusting the exhaust easy. The stainless plate on the hanger has a bunch of adjustment possible. The rubbers are pretty solid, you don't get much movement yanking on the exhaust, so should be good to go.

This is one of the brackets for the rear mounts near the end of the exhaust. Again there's captive nuts welded on and hanger brackets with adjustment.

The mild steel tail pipes got sandblasted and will be sprayed with black high-temp paint.

Sunday, November 11, 2012

Road Trip


Finally got a chance to edit some footage I shot from a road trip back in 2010.

Music: 'Oh Fair Moonlight' by Fly My Pretties.

Wednesday, November 7, 2012

Exhaust Flanges


Welded on the water-jet cut stainless flanges. The colours came out prettily.

Tuesday, November 6, 2012

Exhaust welding

TIG welded the tube work of the exhaust.

I love stainless...   leave it bare and it won't rust! And welds will stay colourfull. I used Solar Flux type B to shield the inside of the weld.


Mild steel, and it's rusty already! The last section of the exhaust (the pipes over the diff to the rear of the car) is mild steel. Stainless can sound a bit 'tinny' apparently, and I want a more mellow/deep sound. I save a bit of money too. These will be sandblasted and painted in high temp black paint, then the bends will be wrapped with thermal wrap where they pass by the shocks and gas tank (mainly 'cause I have some unused wrap, and because it'll look cool).

Wednesday, October 31, 2012

Handbrake work and driveshaft loop

Made some room for the new handbrake setup and exhaust.


Starting to work out the cable routing...

Made some mounts for a driveshaft loop I bought. This just clears the exhaust nicely.

Thursday, October 25, 2012


Tube work finished! Ready for the final weld up with flanges and hangers. The tips will be done once the car is complete as I plan on modifying the rear valence a bit.

Wednesday, October 24, 2012


Friday, October 19, 2012

Dump pipes

 Continuing with the x-pipe fabrication. Today's work was the dump pipes.

I got the 3" pipes butting up nicely with the 3.5" dump pipes. I sprayed paint into the end of the 3" tube to mark where to cut the internal hole.

Welded up the x-pipe center. Forgot how much I enjoy TIG welding. Well, when it goes nicely anyway!

Tacked together ready for the next stage.

Thursday, October 18, 2012

Exhaust work

Work is progressing slowly on the exhaust fabrication work. I want to tuck it all up as much as possible for ground clearance, and it takes some figuring out. I'm doing the work out at Motorsport Developments, cheers Sheldon!

I started with the x-pipe, and quickly modeled it in 3D to get the shape to cut in the 90º bends. These 304 stainless mandrel bends are expensive and I don't want to mess any up. I printed a template and cut as marked.


The tacked together x-pipe.

I had to modify the crossmember to get the sort of ground clearance I want for the 3.5" pipe. I want to be able to run the car nice and low!

Saturday, October 6, 2012

'Body, meet Motor!'

Test fit the drivetrain today, to fix templates where the header flanges sit, so I can fabricate the exhaust with the body on the rotisserie.

I raised the angle of the drivetrain a little higher than this shot for some extra ground clearance, then bolted some 10mm flanges onto the header flange and welded them to the body.

3.5" stainless tube. Greedy motor!

The various mandrel bends that I'll use to fabricate the exhaust. Plus some straight tube. How hard could it be? Ha ha...

Saturday, August 25, 2012

Turned the car back into a trailer today, so it's ready to go back to the workshop for the exhaust fabrication. I'm also mocking up the whole rear suspension with the 1" spring relocation and the Hotchkis sway bar, so I can route the 3" pipes nicely round everything.

I like the collection of surfaces and finishes in this photo, but I'm looking forward to this all being blasted clean and painted black. If I build a rat rod someday, a good look would be this stitch-weld-burned green primer and bare steel with black patches. With a bright orange motor like the one below.
Some of the aesthetic stages the motor went through. This is what happens when a designer has a motor sitting next to his desk!

Friday, August 17, 2012

Gratuitous 440ci motor porn

This thing is looking so good sitting next to my desk I think I'll miss it when it's in the car. New Holley Ultra HP carburetor and KRC racing power steering pump. I'll be fabricating new brackets for the alternator and power steering pump, and I need to modify the new swivel water neck to fit the Milodon high flow thermostat. Hopefully this thing goes as good as it looks, and it sure looks good to me!

Kuda Komponents III


Thursday, August 16, 2012

New stuff

I've pretty much finished the work on the shell now. Lately I've squared up the suspension mounting points, which required some careful measuring and fixing, hence the string as a center line. The car was poorly built from the factory and had some defects from age and accident damage, so I wanted to get it as square as possible while it was in this stage.

To give you an idea of how poorly built these cars are check out these leaf spring hangers. The one on the right is standard (these are Dr Diff 1" relocation hangers, that move the springs in 1" either side, so you can fit larger tires) and the one on the left I've modified to square the spring eye mounting points from side to side. It was easier for me to modify the hangers than it was to try and correct the shoddy factory spring perches (which I stitch welded and added torque boxes to before noticing how misaligned they were). Amazing how different they were, my car must have been built on a Friday...

I added new perches to the diff housing, moving them in 1" either side.

And I also just received my third big shipment of parts from the states. Early xmas!

The big box contained new rear quarters for the car, which seem to fit up very nicely. New sheetmetal is a wonderful thing. There's a new tail panel, deck filler panel, trunk drops, and trunk gutters as well, along with a new roof I purchased a couple years ago.

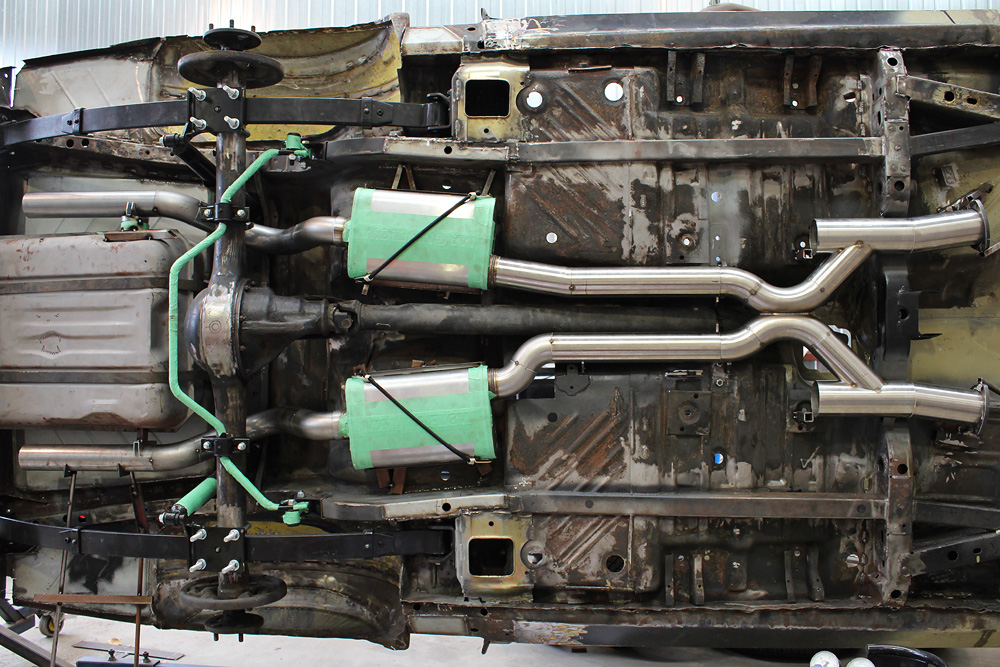
Now onto the exhaust fabrication!

Thursday, August 2, 2012

Exhaust plans

Here's a quick concept image of the exhaust for the car. This is my next job, and pretty much the last before I'm finished with the shell and can sandblast and paint it. I'll leave the electric cutouts and the side exit pipes till after the car is done. Better start practicing some stainless TIG welding!

Monday, July 2, 2012


Wednesday, June 27, 2012

I think I'll miss this view when it's installed in the car...

Sunday, June 17, 2012

Disturbing the peace. Sorry to my neighbours!
Actually the neighbours seemed to enjoy it, a bunch of parents brought their little kids out to have a look!
If I were to go with shiny paint for the Kuda, it may look something like this. The Hurst logo would probably be replaced with a similar coloured custom logo. Ignore the 4 lug wheels, I couldn't be bothered editing the photo I started with (rays TE37V wheels) to 5 lug...

Sunday, June 3, 2012